
How to Compress Images Without Losing Quality (2025 Guide)
Why Image Compression Matters
Every 100KB you shave off your images can improve load time by ~100ms on 4G connections. For e-commerce sites, this directly impacts conversion rates.
Studies show that a 1-second delay in page load time can reduce conversions by up to 7%. Since images typically make up 40-60% of total page weight, they're the first place to look for quick wins.
The good news: you can often reduce image file sizes by 60-80% without any visible quality loss. This guide walks you through the exact process.
Understanding Quality Settings
Most formats use a quality parameter (0-100):
Here's what the numbers mean in practice for a 1200×800 product photo:
| Quality | File Size (WebP) | Visual Difference |
| 95 | 280 KB | Indistinguishable from original | ||||
| 85 | 145 KB | Indistinguishable from original | ||||
| 75 | 95 KB | Very subtle detail loss | ||||
| 60 | 62 KB | Noticeable in flat areas | ||||
| 40 | 38 KB | Visible artifacts | The jump from quality 95 to 85 saves 48% file size with zero perceptible difference. That's why quality 80-85 is the industry standard. Lossy vs Lossless Compression | Type | What it does | Best for |
| Lossy | Removes imperceptible data | Photos, gradients |
| Lossless | Optimizes encoding only | Logos, screenshots, icons |
When to use lossy: Product photos, hero images, blog images, backgrounds — anything photographic.
When to use lossless: Company logos, UI screenshots, diagrams, images with text — anything where pixel-perfect accuracy matters.
Most modern tools default to lossy compression because it achieves dramatically better file size reduction. WebP lossy at quality 80 typically produces files 70% smaller than the original JPEG.
The Resize-Then-Compress Rule
The single biggest mistake websites make is serving oversized images. If your image displays at 800×600 pixels, there's no reason to serve a 4000×3000 file.
The math: A 4000×3000 image has 25x more pixels than an 800×600 display slot. Even with perfect compression, you're wasting bandwidth.
Always resize first, then compress:
max-width)For example, a 800px-wide card image should be exported at 1600px wide (2x for Retina), then compressed to WebP at quality 80.
Practical Workflow
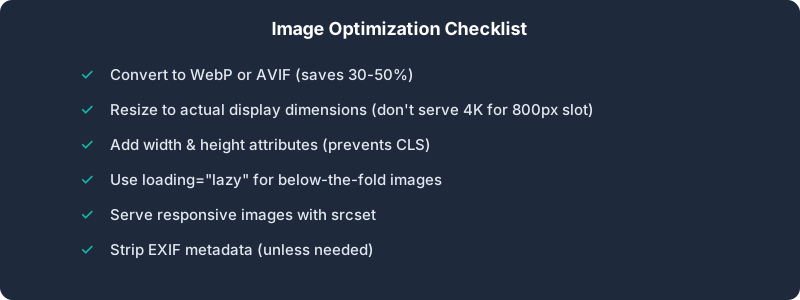
loading="lazy" for below-the-fold imageswidth and height to prevent layout shiftFormat Selection Guide
Not sure which format to use? Here's a quick decision tree:
For a deeper comparison, see our WebP vs AVIF guide.
The Privacy Advantage
Unlike online compressors that upload your images to remote servers, our tool processes everything locally in your browser using WebAssembly. Your images never leave your device.
This matters especially for:
Key Takeaway
Quality 80 + WebP format = 70% smaller files with no visible quality loss for most images. Start there and adjust as needed. Resize to actual display dimensions first, and always batch process for efficiency.
Ready to optimize your images?
Try BulkPicConv — Free